Publishing a TypeScript library
Do you have bits of code that you keep copying and pasting from one project to another? If so, it probably means you should create a library!
In this lesson, I’ll show you how to create an open-source library with Deno and JSR. It’s incredibly easy since Deno and JSR can test, build, and publish both your code and documentation.
Note that I’m assuming you’ve completed the previous lessons, especially these:
Creating a JSR account and package
JSR is the TypeScript registry where we will publish our library. It’s open source and free to use. It’s maintained by the same team as Deno.
First, create an account on the platform. You can link your GitHub account to it for convenience.

Next, click on Publish a package.

You can then choose a scope (by default, it’s your GitHub username) and a name for your library. Here I wrote my-first-library.
Hit Create.

Keep the next page open for now.

Coding the library
It’s time to write some code! In this project, we’re going to reuse some of the code from the previous lesson Using tests in your projects.
Create a new folder and open it in VS Code.
Then, create a functions folder and a getPercentage.ts file with the code and documentation below.
/**
 * Calculates a percentage and returns it as a string formatted with a percentage sign ("%").
 *
 * @example
 * Basic usage
 * ```ts
 * getPercentage(50, 200); // "25%"
 * getPercentage(0, 0);    // "0%"
 * ```
 *
 * @param current - The current value to calculate the percentage for.
 * @param total - The total value to calculate the percentage against.
 * @returns A string representing the percentage. If `total` is 0, returns "0%".
 */
export default function getPercentage(
    current: number,
    total: number,
): string {
    if (total === 0) {
        return "0%";
    } else {
        const percentage = (current / total) * 100;
        return `${percentage}%`;
    }
}
Create also an index.ts file — this will be the entry point of your library. When someone wants to use your library, this is the file they’ll import from.
In this file, we’re just going to import our getPercentage function and re-export it. This is convenient because if you have many classes, functions, or other items to publish in your library, you can gather and export them all from here.
For example, here are all the functions exported in my journalism library.
import getPercentage from "./functions/getPercentage.ts";

export { getPercentage };
Testing your code is critical before publishing it. Let’s reuse the test from the Using tests in your projects lesson.
Create a tests folder and add a getPercentage.test.ts file inside it.
import { assertEquals } from "jsr:@std/assert";
import getPercentage from "../functions/getPercentage.ts";

Deno.test("should return 50%", () => {
    assertEquals(getPercentage(50, 100), "50%");
});
Deno.test("should return 33%", () => {
    assertEquals(getPercentage(33.333, 100), "33%");
});
Deno.test("should return 0%", () => {
    assertEquals(getPercentage(0, 100), "0%");
});
Deno.test("should return 0%", () => {
    assertEquals(getPercentage(1, 0), "0%");
});
Finally, install the @std/assert standard library with: deno add jsr:@std/assert.
Now, if you run deno test, everything should run smoothly.

We mustn’t forget to add the fields recommended by JSR to our deno.json. I copied and pasted them from the web page I told you to keep open earlier.
Here’s what we are adding:
- The name of the library
- The version number (check the lesson Understanding library versions for more)
- The license, which is MIT here. It’s a common license for open-source libraries, but you can change it if you want.
- What the library should export. Since our entry point is
./index.ts, I just replaced./mod.tswith it.
{
  "name": "@nshiab/my-first-library",
  "version": "0.1.0",
  "license": "MIT",
  "exports": "./index.ts",
  "imports": {
    "@std/assert": "jsr:@std/assert@^1.0.12"
  }
}
Since this lesson is focused on publishing the library, I won’t push this code to GitHub. But in a real-life scenario, I strongly encourage you to save your code somewhere in the cloud! Feel free to check the GitHub lesson for more.
Publishing the library
Now just run deno publish!
A webpage should automatically open in a web browser. If not, click on the link in the terminal.

JSR will ask to authorize the publication of the library. It’s also an opportunity to ensure the version is the correct one.

After a few seconds, you’ll be redirected to… your library’s page! It’s now live!
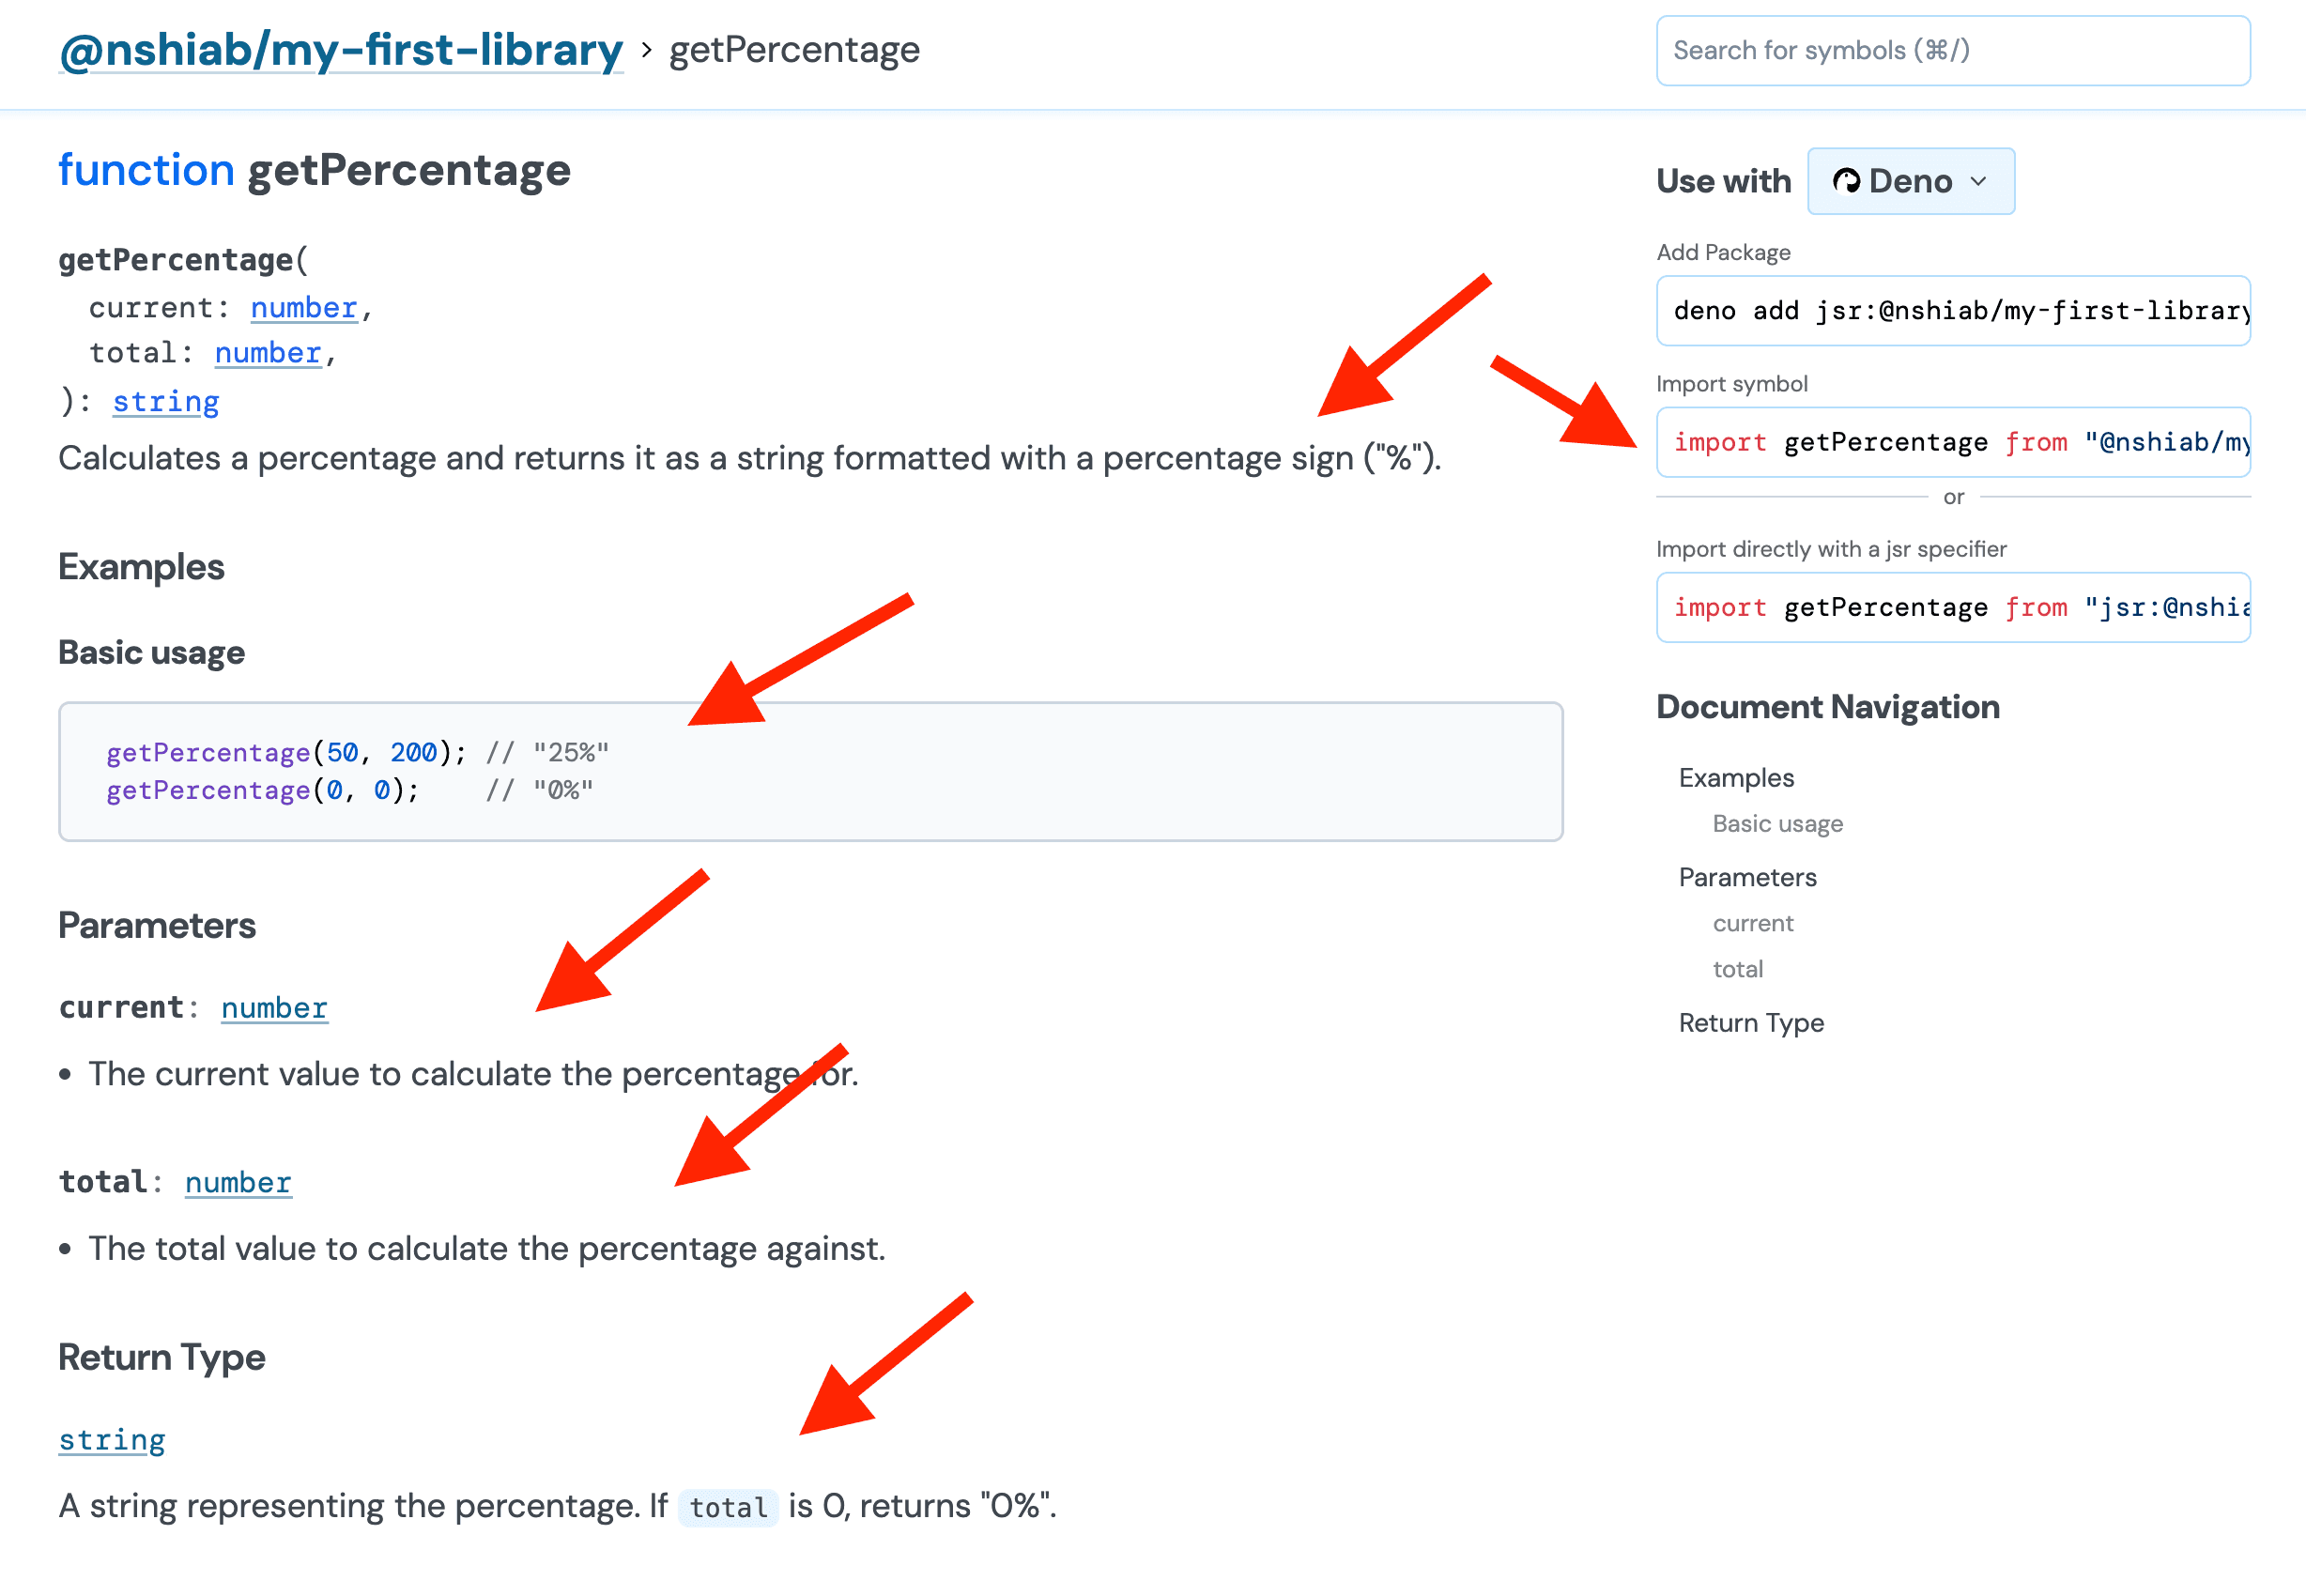
If you click on the Docs tab, you’ll see your function getPercentage.

If you click on the function, you’ll be redirected to its page, with the JSDoc we wrote in its file! Now, anyone can use your code — and JSR automatically published the code and the documentation for the whole world to see! Isn’t that amazing? 🤩
Importing and using the library
With the library now published, we can install it in any project we want, just like any of the others we used in previous lessons!
Create another folder and open it with VS Code.
Then run something similar to deno add jsr:@nshiab/my-first-library, but with your username and library name, as suggested on JSR. You’ll see your library imported in a deno.json.
Create a new main.ts with the code below. Again, replace @nshiab/my-first-library with yours.
Since your library exports getPercentage in its entry point, it’s available to be imported!
import { getPercentage } from "@nshiab/my-first-library";

const percentage = getPercentage(20, 100);
console.log(percentage);
And now, if you run deno run main.ts, you’ll see your function being called and returning the right output!
Don’t delete this project’s folder for now — we’ll come back to it.

Testing before publishing
What we did is already amazing: we created reusable and documented code.
But it’s very important to run our tests before publishing. Trust me: you need to resist the urge to publish too quickly! Too often I told myself, “This is just a tiny change, I can publish directly,” only to end up with a broken version of the library live.
We already have tests in place. Let’s create a test-publish task in deno.json to run them before publishing. If you don’t know what tasks are, check the Running tasks lesson.
While we’re at it, we can also chain a few commands to make sure our code is well formatted (deno fmt) and that our types are correct (deno check).
So now, instead of running deno publish directly, we would run deno task test-publish. If there’s a problem with our types or tests, Deno will stop and won’t publish the library.
{
  "tasks": {
    "test-publish": "deno fmt && deno check index.ts && deno test && deno publish"
  },
  "name": "@nshiab/my-first-library",
  "version": "0.1.0",
  "license": "MIT",
  "exports": "./index.ts",
  "imports": {
    "@std/assert": "jsr:@std/assert@^1.0.12"
  }
}
Publishing a new version
Let’s update our project and publish a new version.
Right now, there is nothing on the library’s main page on JSR — we’re missing a README.md. This is just some text to tell everyone what the library is about.
Create a new README.md file in your project with the following text in it.
This is my first library published on JSR, created as part of the
[Code Like a Journalist](https://www.code-like-a-journalist.com/en) course.

If you’d like to learn how to publish your own TypeScript library, check out the lesson:
[Publishing a TypeScript Library](https://www.code-like-a-journalist.com/en/ninja-moves/publishing-library).
In our deno.json, let’s update the version. Since this is a tiny change, I suggest updating it to 0.1.1.
{
  "tasks": {
    "test-publish": "deno fmt && deno check index.ts && deno test && deno publish"
  },
  "name": "@nshiab/my-first-library",
  "version": "0.1.1",
  "license": "MIT",
  "exports": "./index.ts",
  "imports": {
    "@std/assert": "jsr:@std/assert@^1.0.12"
  }
}
And now we use our new task test-publish to republish our library: deno task test-publish.
You can see that the checks and tests are run before publishing now! 🥳

Approve the publication like before, and after a few seconds, you’ll see your library page updated with the content of your README!
You can also see that the latest version is now 0.1.1.

Updating to a new version in a project
A new version of our library has been published! It’s time to update the project using it.
To be totally honest, we wouldn’t really need to update in a real-case scenario… it’s just the README that has been added! But I want to show you how to easily update dependencies. 🤓
In the project using the library, run deno outdated. Deno will check all JSR and NPM library versions used in your project and let you know if you’re behind on any.
Here’s a description of the columns:
Currentis the version installed in your projectUpdateis the version Deno suggests installing. It might not be the latest if you used^or~for the range of acceptable versions in yourdeno.json. Check the Understanding library versions lesson for more.Latestis the latest available version.

If you want to update your library, you could do it manually with deno add jsr:@nshiab/my-first-library@0.1.1.
But when you have a lot of libraries to update, you can run the suggested Deno command to do all of them at once: deno outdated --update.
And done! We just updated and we’re now using our new version!

Advanced configuration
We used the default JSR settings for our library, but there are some options available if you click on the Settings tab.
In the settings, you can add more information about your library, like a short description for anyone using the JSR search engine. Note that you can also make it unlisted, so it won’t be discoverable through search. You can also select which runtime you’ve tested your library on (Deno, Node.js, Bun, etc.).
If your library is outdated, broken, and you don’t want to maintain it anymore, you can archive it.

There is also an option to link the library to a GitHub repository. Doing so enables automatic publishing of your library with GitHub Actions.
It involves a bit more configuration, but it could be interesting if you plan to update your library often and want to automate the process.
If you’d like to go down that route, these lessons will be helpful:
For example, here’s my workflow to publish a new version of the Simple-Data-Analysis library:
-
I create a new issue when there’s a bug to fix or a new feature to add.
-
From the issue, I create a branch and work on it. I make sure to add new tests to cover the fix or new feature.
-
I create a pull request to merge the branch into
main. I have a GitHub Actions workflow that runs the tests. If all checks and tests pass, the pull request is accepted and merged. -
When I’m ready to publish a new version (often after a few pull requests), I run one of the
patch,minor, ormajortasks locally, as defined in thedeno.jsonfile from the repository. -
These tasks run a script called
incrementVersion.ts, which updates the version indeno.json, creates a Git tag and pushes it to GitHub. -
When a new tag is pushed to GitHub, two workflows are triggered: one to publish the library on JSR, and another to create a release on GitHub with a summary of all the changes from the approved pull requests.
I like this workflow because it keeps everything in sync, saves me a lot of typing/clicking, and creates easy-to-read, useful releases. Here’s the most recent one, for example, at the time of writing:

Publishing to JSR directly from GitHub also certifies the provenance of the library, which helps increase its score.
To be honest, the score isn’t that important — it mainly promotes best practices. If you plan to be the only user of your library, don’t worry too much about it. Manual publishing might be more than enough!

Svelte components library
You can also create your own library of Svelte components, as detailed in the SvelteKit documentation. Their examples focus on building with Node.js and publishing to NPM, but it’s very likely that the same can be done with Deno and JSR. I haven’t tested it yet — but it sounds like great material for a future lesson! 🔮
Private registries
Sometimes, you don’t want all your code to be public — even though I’d argue that in most cases, you probably should. But within a company, creating a private library can be incredibly useful for sharing code among teammates and reusing tested classes, functions, and methods across multiple projects.
With NPM, you can pay to use private registries.
With JSR, you can unlist your library so that it doesn’t appear in search results — though it remains publicly accessible. Fully private registries aren’t available on JSR yet, but the team is actively working on it.
Conclusion
Publishing a TypeScript library has never been easier. Before moving all my libraries to JSR, I had them published on NPM.
NPM is truly amazing, with millions upon millions of open-source libraries available to anyone. It’s a big factor behind the success of JavaScript and TypeScript as programming languages. But publishing on it is more difficult and convoluted.
With Deno and JSR, you can write, test, document, and publish libraries with a minimal and very efficient setup. So stop copying and pasting code and publish your library! 😎