Refactoring
Coding is like a journey. You know where you start and where you want to go (in theory 😅). But you don’t know which road to take. So you start exploring, try one way, then go back, take a shortcut, hit dead ends, and follow longer roads until… you finally arrive at your destination. And that’s totally okay.
It’s the same with your code. You’ll write a lot, make mistakes, find workarounds, and eventually get your first results. Your code will be messy and long. And that’s fine.
This is why refactoring is an important step. It means restructuring your code to improve its readability, maintainability, and sometimes performance, while keeping the same output.
A key aspect of refactoring is breaking down long scripts into modular functions.
In this lesson, we will take the final code from the Savings account calculator 💸 and refactor it. If you haven’t done this project, do it first! I also expect that you have completed all of the lessons in the First steps 🧑🎓 section.
Setup
Make a new folder somewhere on your computer, open it with VS Code, and create two files:
main.ts, where we will write our code.deno.json, which lets VS Code know this is a Deno project and enables the Deno extension. You can tweak settings in this file, but we’ll keep it empty for now.
Open the terminal and run the following command: deno run --watch --check main.ts
This command clears the terminal and reruns main.ts every time you save it (CMD + S on Mac or CTRL + S on PC).
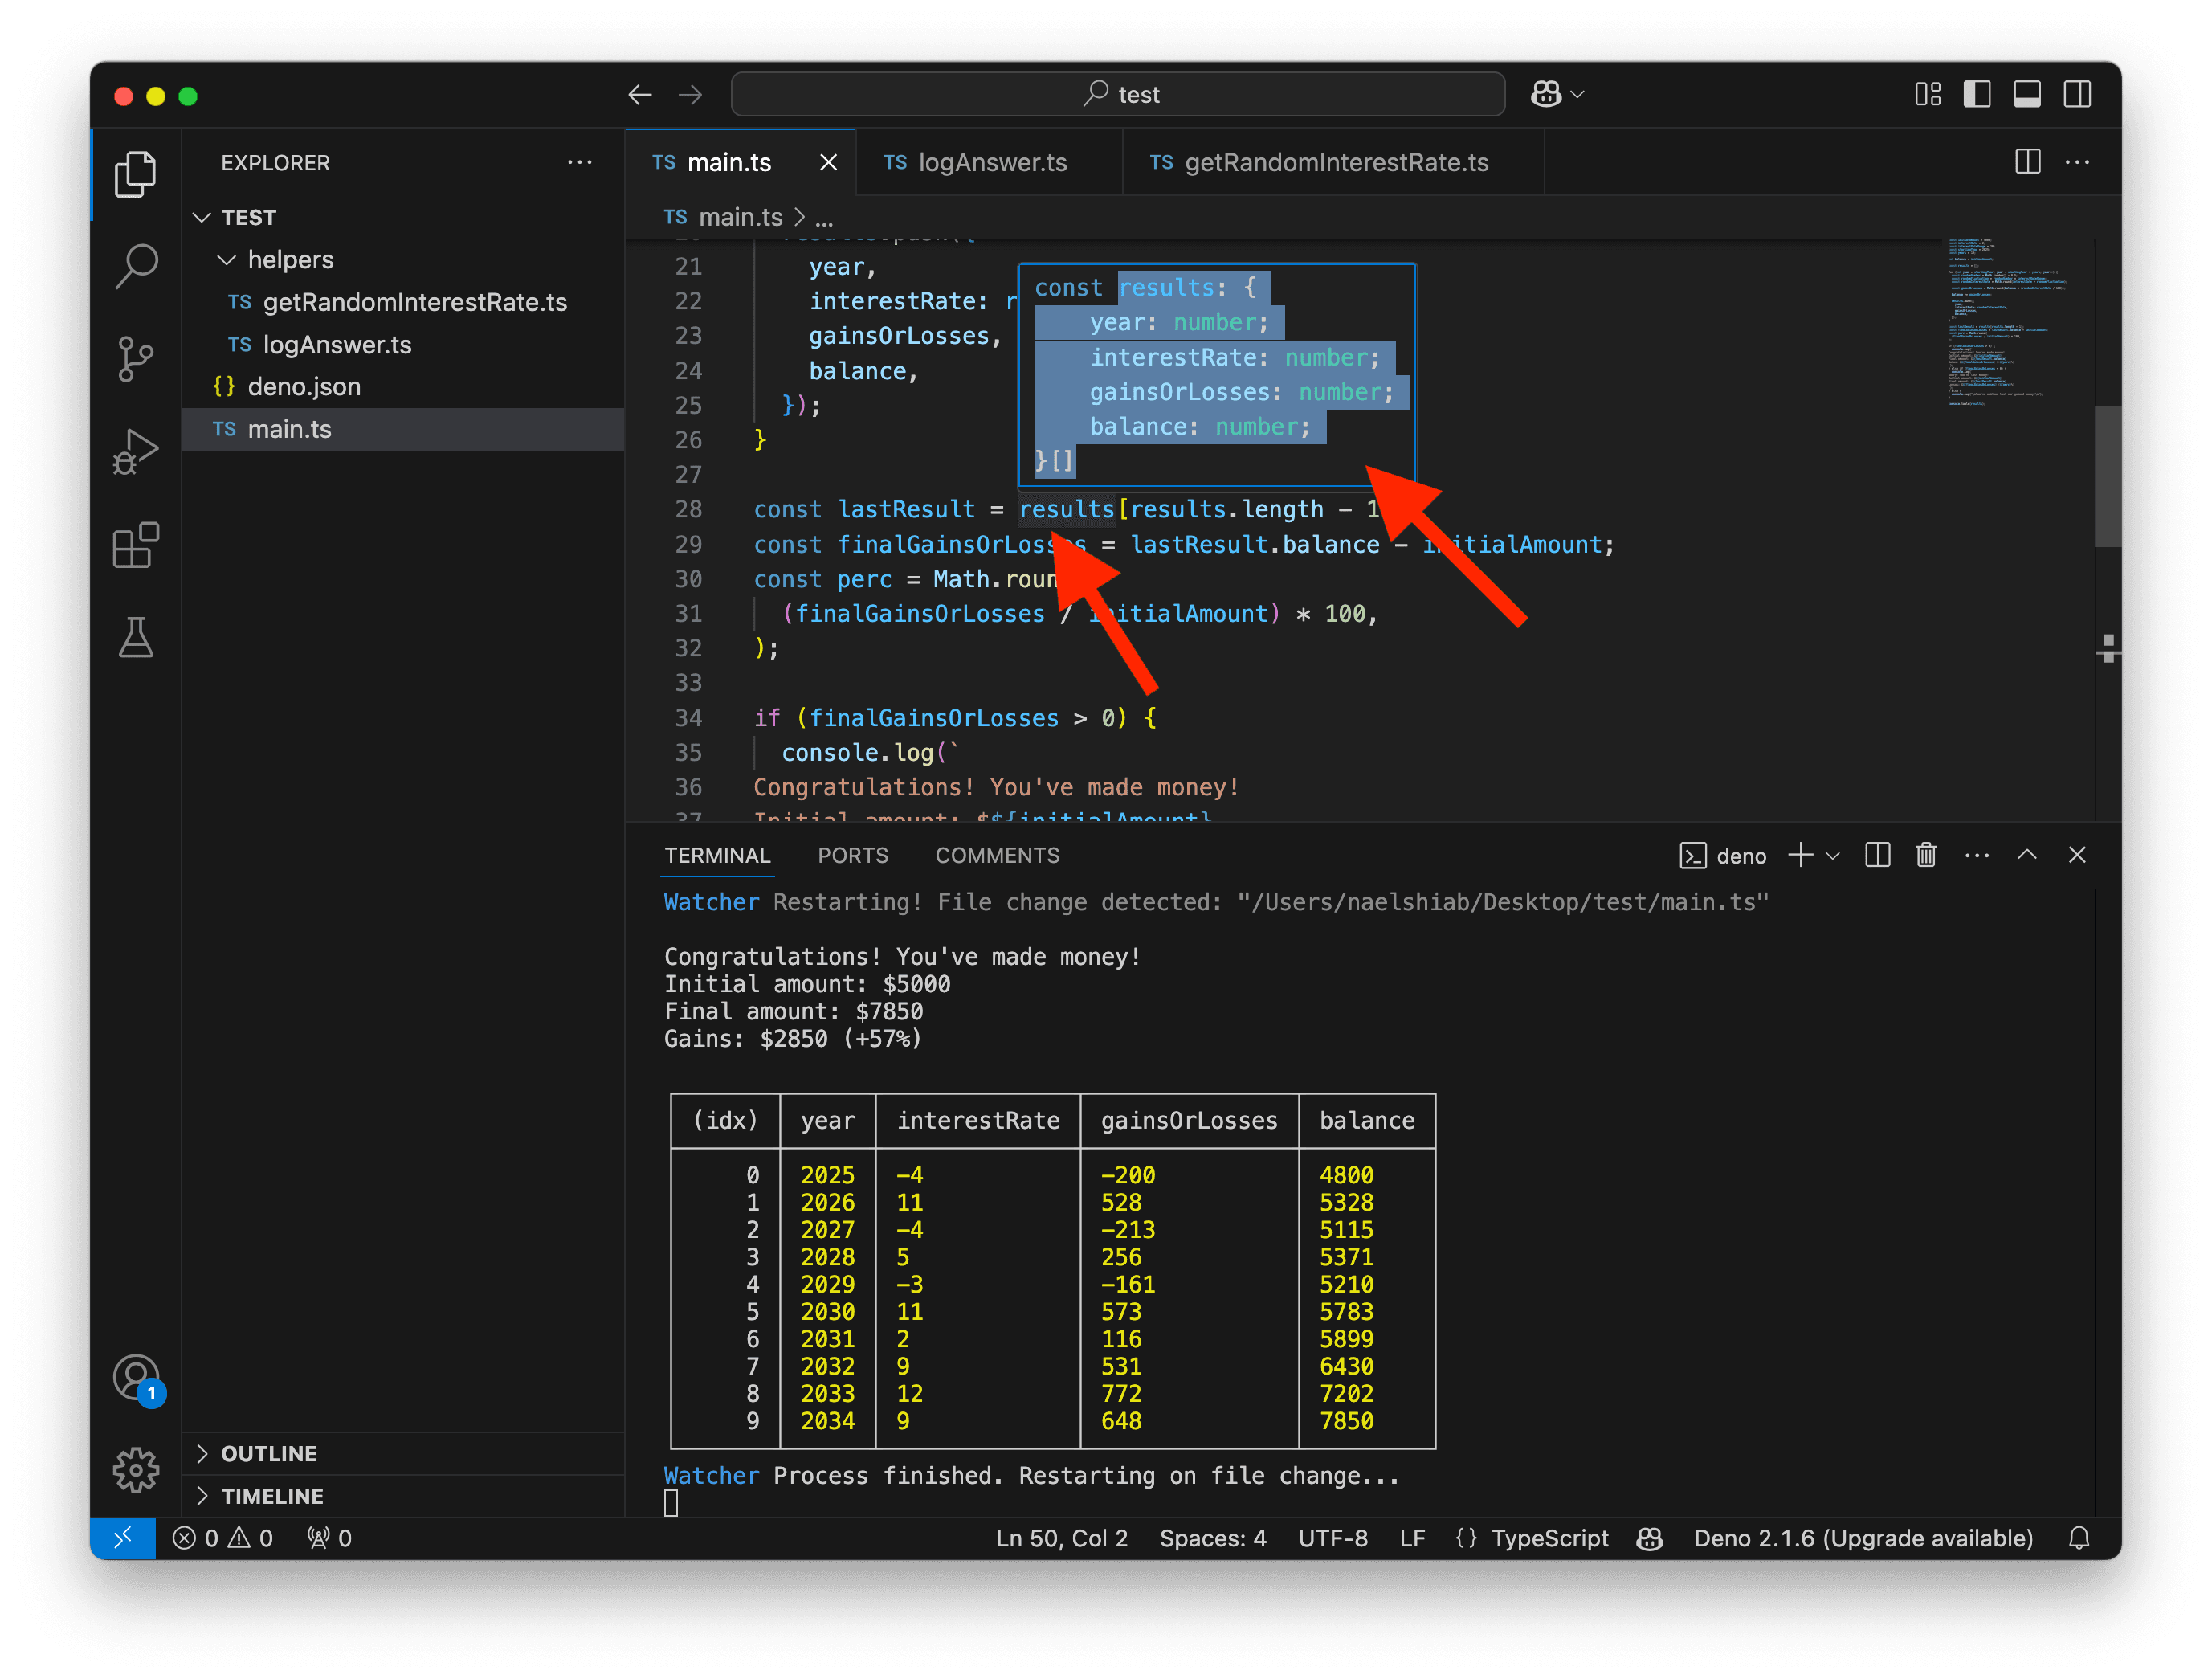
Now, copy, paste, and save this code in main.ts. The script below calculates the gains or losses of a savings account over 10 years.
const initialAmount = 5000;
const interestRate = 2;
const interestRateRange = 20;
const startingYear = 2025;
const years = 10;

let balance = initialAmount;

const results = [];

for (let year = startingYear; year < startingYear + years; year++) {
  const randomNumber = Math.random() - 0.5;
  const randomFluctuation = randomNumber * interestRateRange;
  const randomInterestRate = Math.round(interestRate + randomFluctuation);

  const gainsOrLosses = Math.round(balance * (randomInterestRate / 100));

  balance += gainsOrLosses;

  results.push({
    year,
    interestRate: randomInterestRate,
    gainsOrLosses,
    balance,
  });
}

const lastResult = results[results.length - 1];
const finalGainsOrLosses = lastResult.balance - initialAmount;
const perc = Math.round(
  (finalGainsOrLosses / initialAmount) * 100,
);

if (finalGainsOrLosses > 0) {
  console.log(`
Congratulations! You've made money!
Initial amount: $${initialAmount}
Final amount: $${lastResult.balance}
Gains: $${finalGainsOrLosses} (+${perc}%)
`);
} else if (finalGainsOrLosses < 0) {
  console.log(`
Sorry! You've lost money!
Initial amount: $${initialAmount}
Final amount: $${lastResult.balance}
Losses: $${finalGainsOrLosses} (${perc}%)
`);
} else {
  console.log("\nYou've neither lost nor gained money!\n");
}

console.table(results);
This is what you should see in your terminal, with different values.

Helper functions
The script works well, but reading all of this at once can be a bit intimidating. It could be refactored into something easier to read and understand.
We can do that by moving parts of the code into helper functions. Start by creating a new folder named helpers in your repository.
It looks like lines 12-14 could easily be encapsulated in a function. These lines compute a random interest rate. Let’s create a new file named randomInterestRate.ts in the helpers folder and move these lines into a function.
export default function getRandomInterestRate(
  interestRate: number,
  interestRateRange: number,
) {
  const randomNumber = Math.random() - 0.5;
  const randomFluctuation = randomNumber * interestRateRange;
  const randomInterestRate = Math.round(interestRate + randomFluctuation);

  return randomInterestRate;
}
Lines 28-50 are also great candidates for refactoring. These lines log a message based on the gains or losses. Let’s move them into a function named logAnswer.
I also removed the console.table(results) since we don’t really need it.
export default function logAnswer(
  initialAmount: number,
  results: { balance: number }[],
) {
  const lastResult = results[results.length - 1];
  const finalGainsOrLosses = lastResult.balance - initialAmount;
  const perc = Math.round(
    (finalGainsOrLosses / initialAmount) * 100,
  );

  if (finalGainsOrLosses > 0) {
    console.log(`
Congratulations! You've made money!
Initial amount: $${initialAmount}
Final amount: $${lastResult.balance}
Gains: $${finalGainsOrLosses} (+${perc}%)
`);
  } else if (finalGainsOrLosses < 0) {
    console.log(`
Sorry! You've lost money!
Initial amount: $${initialAmount}
Final amount: $${lastResult.balance}
Losses: $${finalGainsOrLosses} (${perc}%)
`);
  } else {
    console.log("\nYou've neither lost nor gained money!\n");
  }
}
You might be confused by the results type in the code above.
{ balance: number } describes an object with a key balance and an associated number value. The [] at the end indicates that we expect results to be an array of such objects.
This type description is important. In our code, we rely on the balance. This type ensures it’s there. If you try to pass an array of objects without a balance as a number, you’ll get a type error.
To find the proper type, I just hovered over results in main.ts and copied the inferred type. No need to write it yourself! I removed the year, interestRate, and gainsOrLosses keys, since we don’t use them in the function.
Now, we can update our main.ts. We import our new functions and use them. Our script is now simpler and easier to understand.
import getRandomInterestRate from "./helpers/getRandomInterestRate.ts";
import logAnswer from "./helpers/logAnswer.ts";

const initialAmount = 5000;
const interestRate = 2;
const interestRateRange = 20;
const startingYear = 2025;
const years = 10;

let balance = initialAmount;

const results = [];

for (let year = startingYear; year < startingYear + years; year++) {
  const randomInterestRate = getRandomInterestRate(
    interestRate,
    interestRateRange,
  );

  const gainsOrLosses = Math.round(balance * (randomInterestRate / 100));

  balance += gainsOrLosses;

  results.push({
    year,
    interestRate: randomInterestRate,
    gainsOrLosses,
    balance,
  });
}

logAnswer(initialAmount, results);
We could even go one step further by wrapping everything in main.ts inside a function named runSimulation.
Let’s create another file named runSimulation.ts in the helpers folder and move all of this code into it.
Since we are now in the helpers folder, we need to update the import paths for getRandomInterestRate.ts and logAnswer.ts.
Additionally, the constant variables initialAmount, interestRate, interestRateRange, startingYear, and years will now become parameters for the runSimulation function.
import getRandomInterestRate from "./getRandomInterestRate.ts";
import logAnswer from "./logAnswer.ts";

export default function runSimulation(
  initialAmount: number,
  interestRate: number,
  interestRateRange: number,
  startingYear: number,
  years: number,
) {
  let balance = initialAmount;

  const results = [];

  for (let year = startingYear; year < startingYear + years; year++) {
    const randomInterestRate = getRandomInterestRate(
      interestRate,
      interestRateRange,
    );

    const gainsOrLosses = Math.round(balance * (randomInterestRate / 100));

    balance += gainsOrLosses;

    results.push({
      year,
      interestRate: randomInterestRate,
      gainsOrLosses,
      balance,
    });
  }

  logAnswer(initialAmount, results);
}
Now, we can update main.ts and make it… incredibly simple.
import runSimulation from "./helpers/runSimulation.ts";

runSimulation(5000, 2, 20, 2025, 10);
Our code is now very modular. While our original script could only run one simulation at a time, we can now easily run a thousand or more!
import runSimulation from "./helpers/runSimulation.ts";

for (let i = 1; i <= 1000; i++) {
  console.log(`Simulation ${i}`);
  runSimulation(5000, 2, 20, 2025, 10);
}
You might think that creating multiple files makes it more difficult to navigate your code. But if you press CMD on Mac or CTRL on PC and click on a function in your code, VS Code will automatically take you to the function’s file by opening a new tab.
Conclusion
You don’t always have the luxury of time to refactor your code. But if you plan on reusing, sharing, or maintaining your code for a long time, it’s a well-worth investment—especially if you add tests (but tests will be another lesson).