Functions
By encapsulating code within functions, you can reuse the same code over and over. Functions also help break up long scripts into modular chunks, making them easier to manage and debug.
Let’s set things up for this lesson.
Make a new folder somewhere on your computer, open it with VS Code, and create two files:
main.ts, where we will write our code. To start, you can addconsole.log("Hello!");to it.deno.json, which lets VS Code know this is a Deno project and enables the Deno extension. You can tweak settings in this file, but we’ll keep it empty for now.
Open the terminal and run the following command: deno run --watch --check main.ts
This command clears the terminal and reruns main.ts every time you save it (CMD + S on Mac or CTRL + S on PC).
You can use this setup to test the code provided in this lesson.

Basic function
To create a function, you need to declare it using the function keyword, followed by its name with parentheses () and curly brackets {}.
Let’s create a function named sayHello that logs "Hello!". The code you want the function to execute must go between the {}. (We’ll talk about what goes between the () in a minute.)
Copy and paste the code below into main.ts.
function sayHello() {
  console.log("Hello!");
}
If you save and run this code, nothing will get logged. You created a function, but you haven’t called it yet.
To call a function, you need to use its name followed by (), as shown on line 5 below.
function sayHello() {
  console.log("Hello!");
}

sayHello()Giving functions clear and understandable names is key to maintaining a clean, easy-to-debug, and reusable codebase. Since functions are supposed to do something, it’s often a good idea to use a verb as a naming convention.

Now, you can reuse it as many times as you want!
function sayHello() {
  console.log("Hello!");
}

sayHello()
sayHello()
sayHello()
sayHello()
sayHello()
Parameters
Our function is pretty basic. It would be more interesting if we could pass a name to it for a personalized greeting, like "Hello, Nael!"
To achieve this, we need to add a parameter to our function—something it can use.
Parameters are defined between the () when declaring the function, and they are typed.
In the code below, we add a parameter name to the function sayHello and specify that name must be of type string.
function sayHello(name: string) {
  console.log(`Hello, ${name}!`);
}

sayHello();On line 1, the name: string syntax is called an explicit type. It means that name must be a string. Most of the time, the types in your code are inferred. But in some cases, you need to explicitly specify what you want the types to be. Defining function parameters is one of these cases.
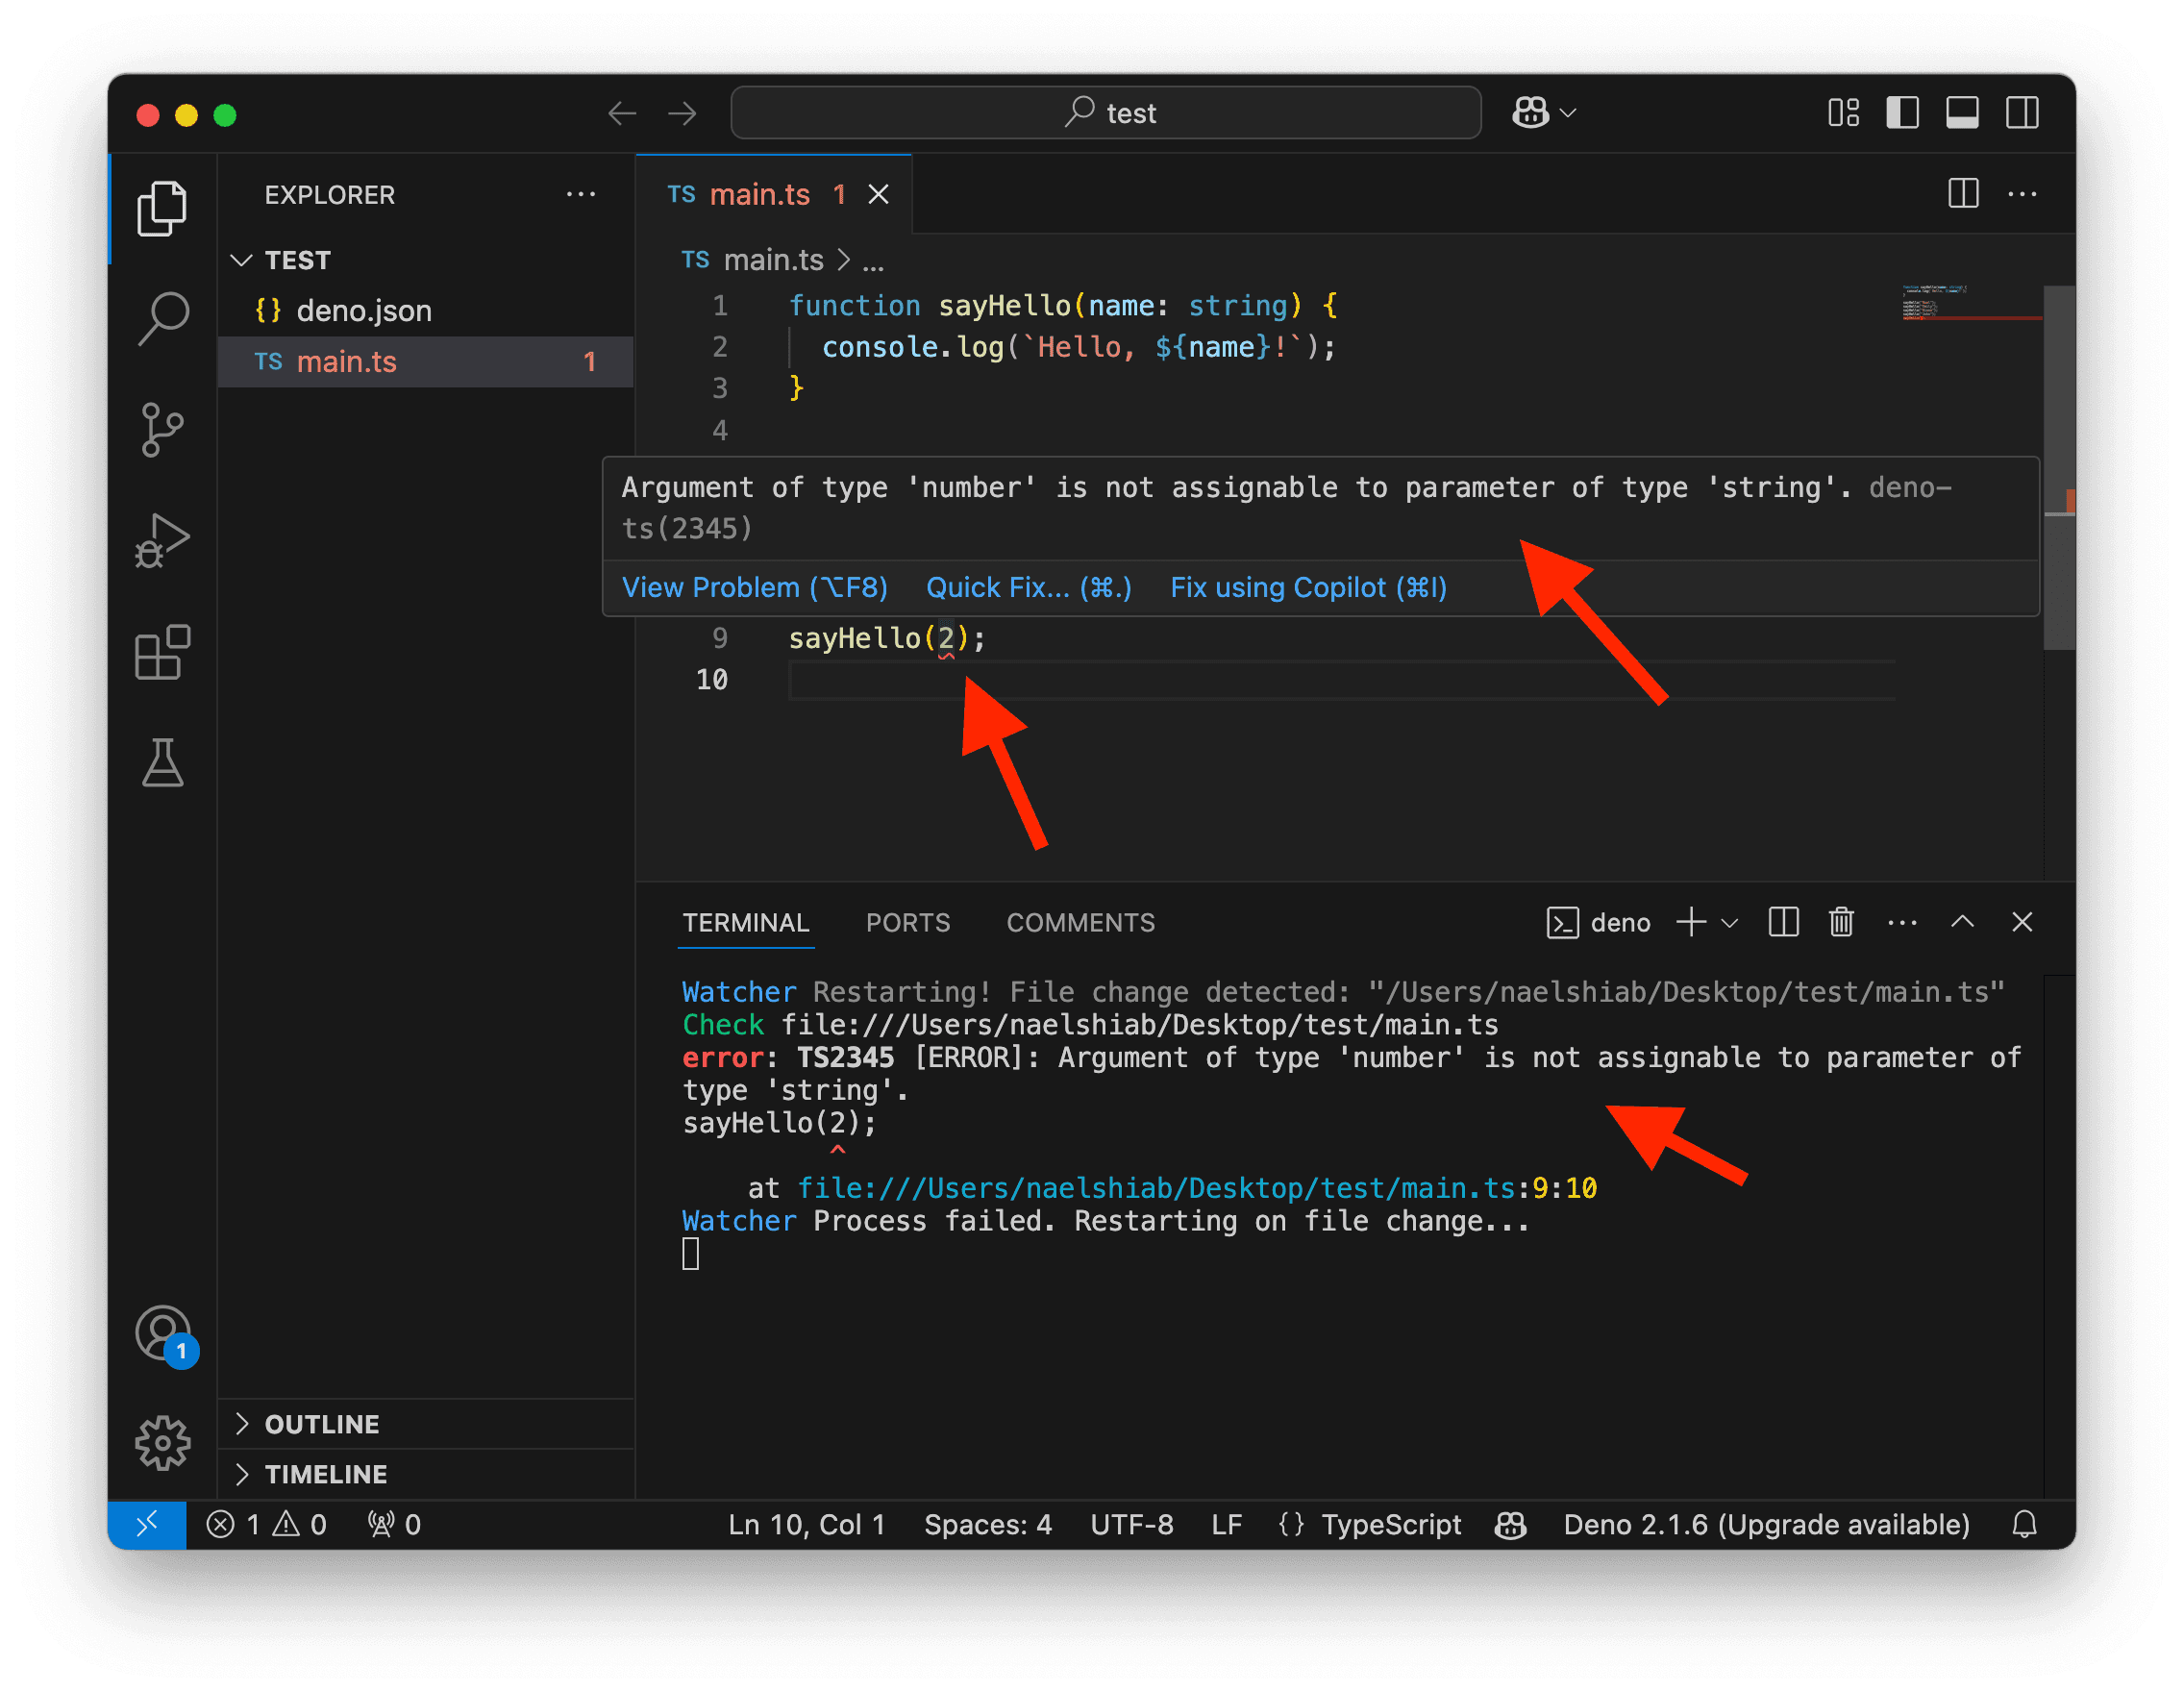
If you copy, paste and save this code, you’ll encounter an error. This happens because your function now expects a parameter name, and you’re not providing it when calling the function on line 5.

Let’s pass the argument "Nael" to the function on line 5. Now, it logs "Hello, Nael!".
function sayHello(name: string) {
  console.log(`Hello, ${name}!`);
}

sayHello("Nael");
And now, we can call the same function with different names.
function sayHello(name: string) {
  console.log(`Hello, ${name}!`);
}

sayHello("Nael");
sayHello("Emily");
sayHello("Diana");
sayHello("John");
sayHello("Jane");
Remember that function parameters are typed. If you try to pass a number instead of a string as name, you’ll get an error.
Again, types work for you. Type checking on function parameters will save you from many debugging sessions. 🐞
Anything can be a function parameter: strings, numbers, booleans, objects, or even other functions!
You can also have multiple parameters between the function (), separated by a comma.
For example, here, we add a new parameter isTired, which is expected to be a boolean. When isTired is true, we add "You look tired...". If it’s false, we add "You look great!".
function sayHello(name: string, isTired: boolean) {
  if (isTired) {
    console.log(`Hello, ${name}! You look tired...`);
  } else {
    console.log(`Hello, ${name}! You look great!`);
  }
}

sayHello("Nael", true);
sayHello("Emily", false);
Return
If you hover over the function (or start typing it), you’ll see the function signature, which indicates the types of its parameters and what it returns.
It shows function sayHello(name: string, isTired: boolean): void. The : void at the end indicates that the function does not return anything, which makes sense because we are just logging information to the terminal for now.

However, in many cases, you want a function to return something.
For example, let’s say you’re Canadian and want to visit the Eiffel Tower. You could create a function to convert Canadian dollars to Euros. As of the time of writing this (2025-01-22), the conversion rate is 0.67.
function convertDollarsToEuros(dollars: number) {
  return dollars * 0.67;
}

convertDollarsToEuros(100);
Here, the function uses the keyword return. If you hover over the function, you’ll see : number at the end, which means this function returns a number.
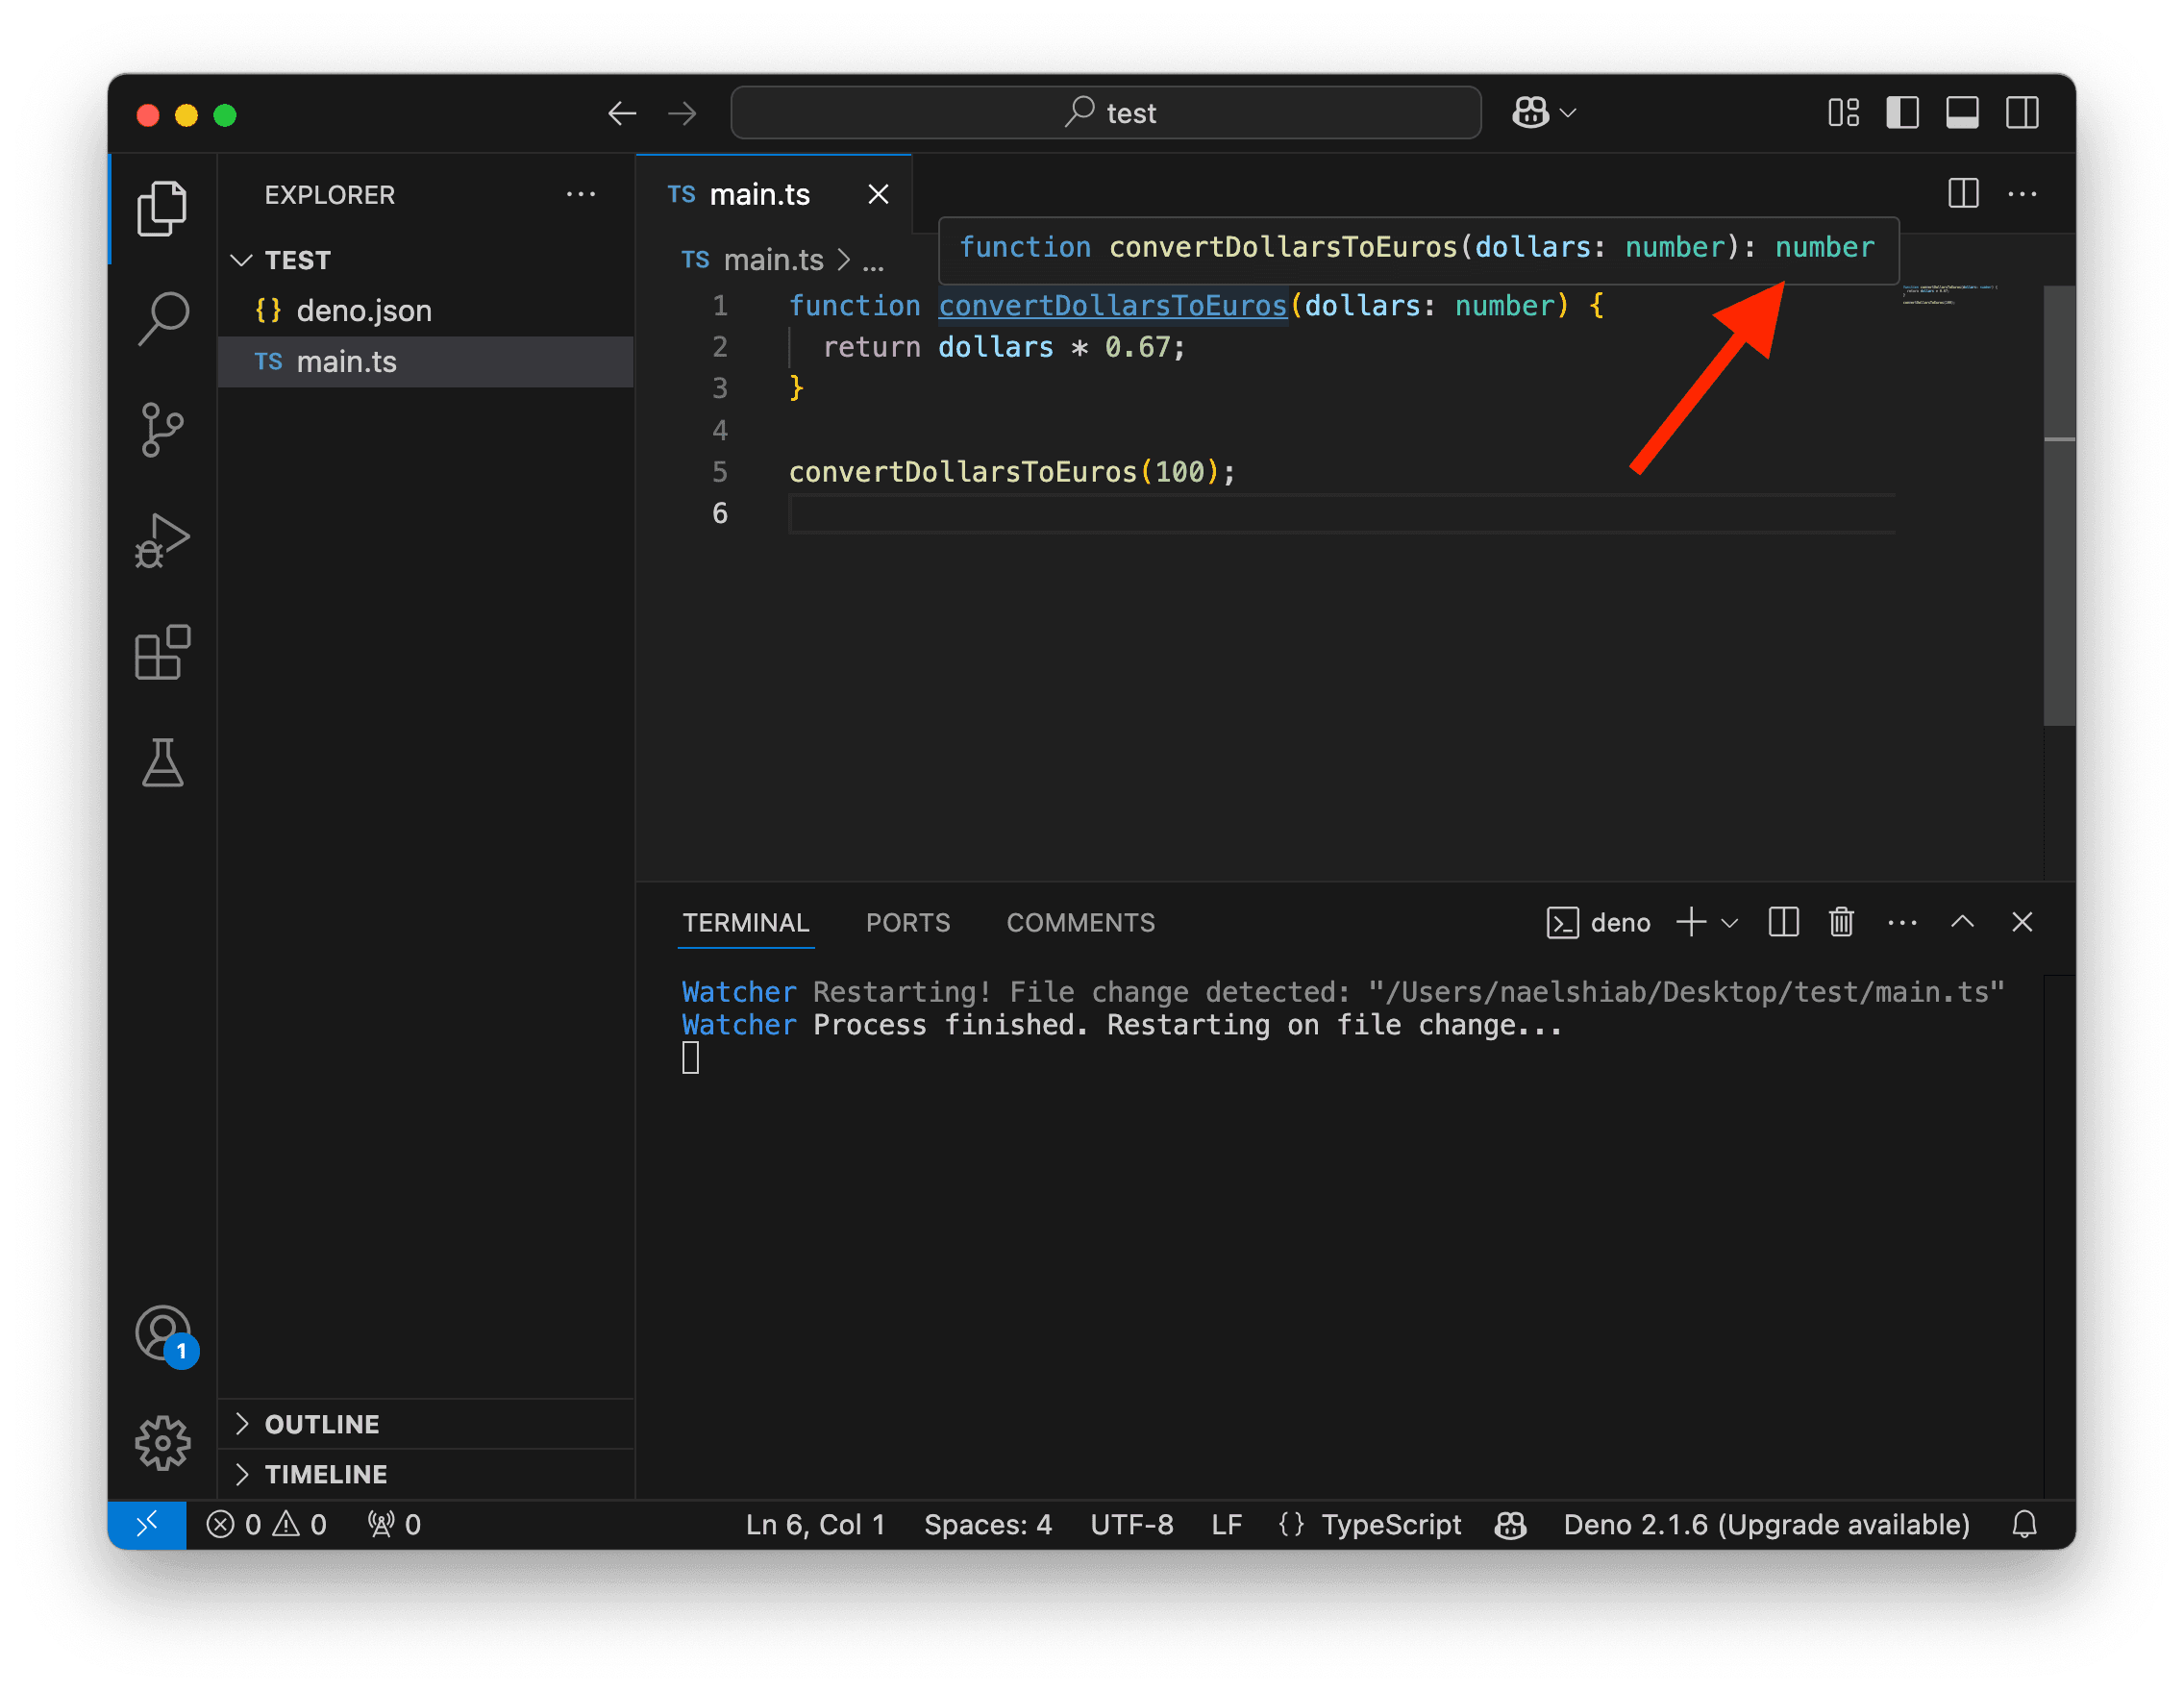
But if you run the code, it looks like nothing happens!
Actually, the calculations are performed and returned—but returned to nowhere! You need to store the result somewhere or log it directly.
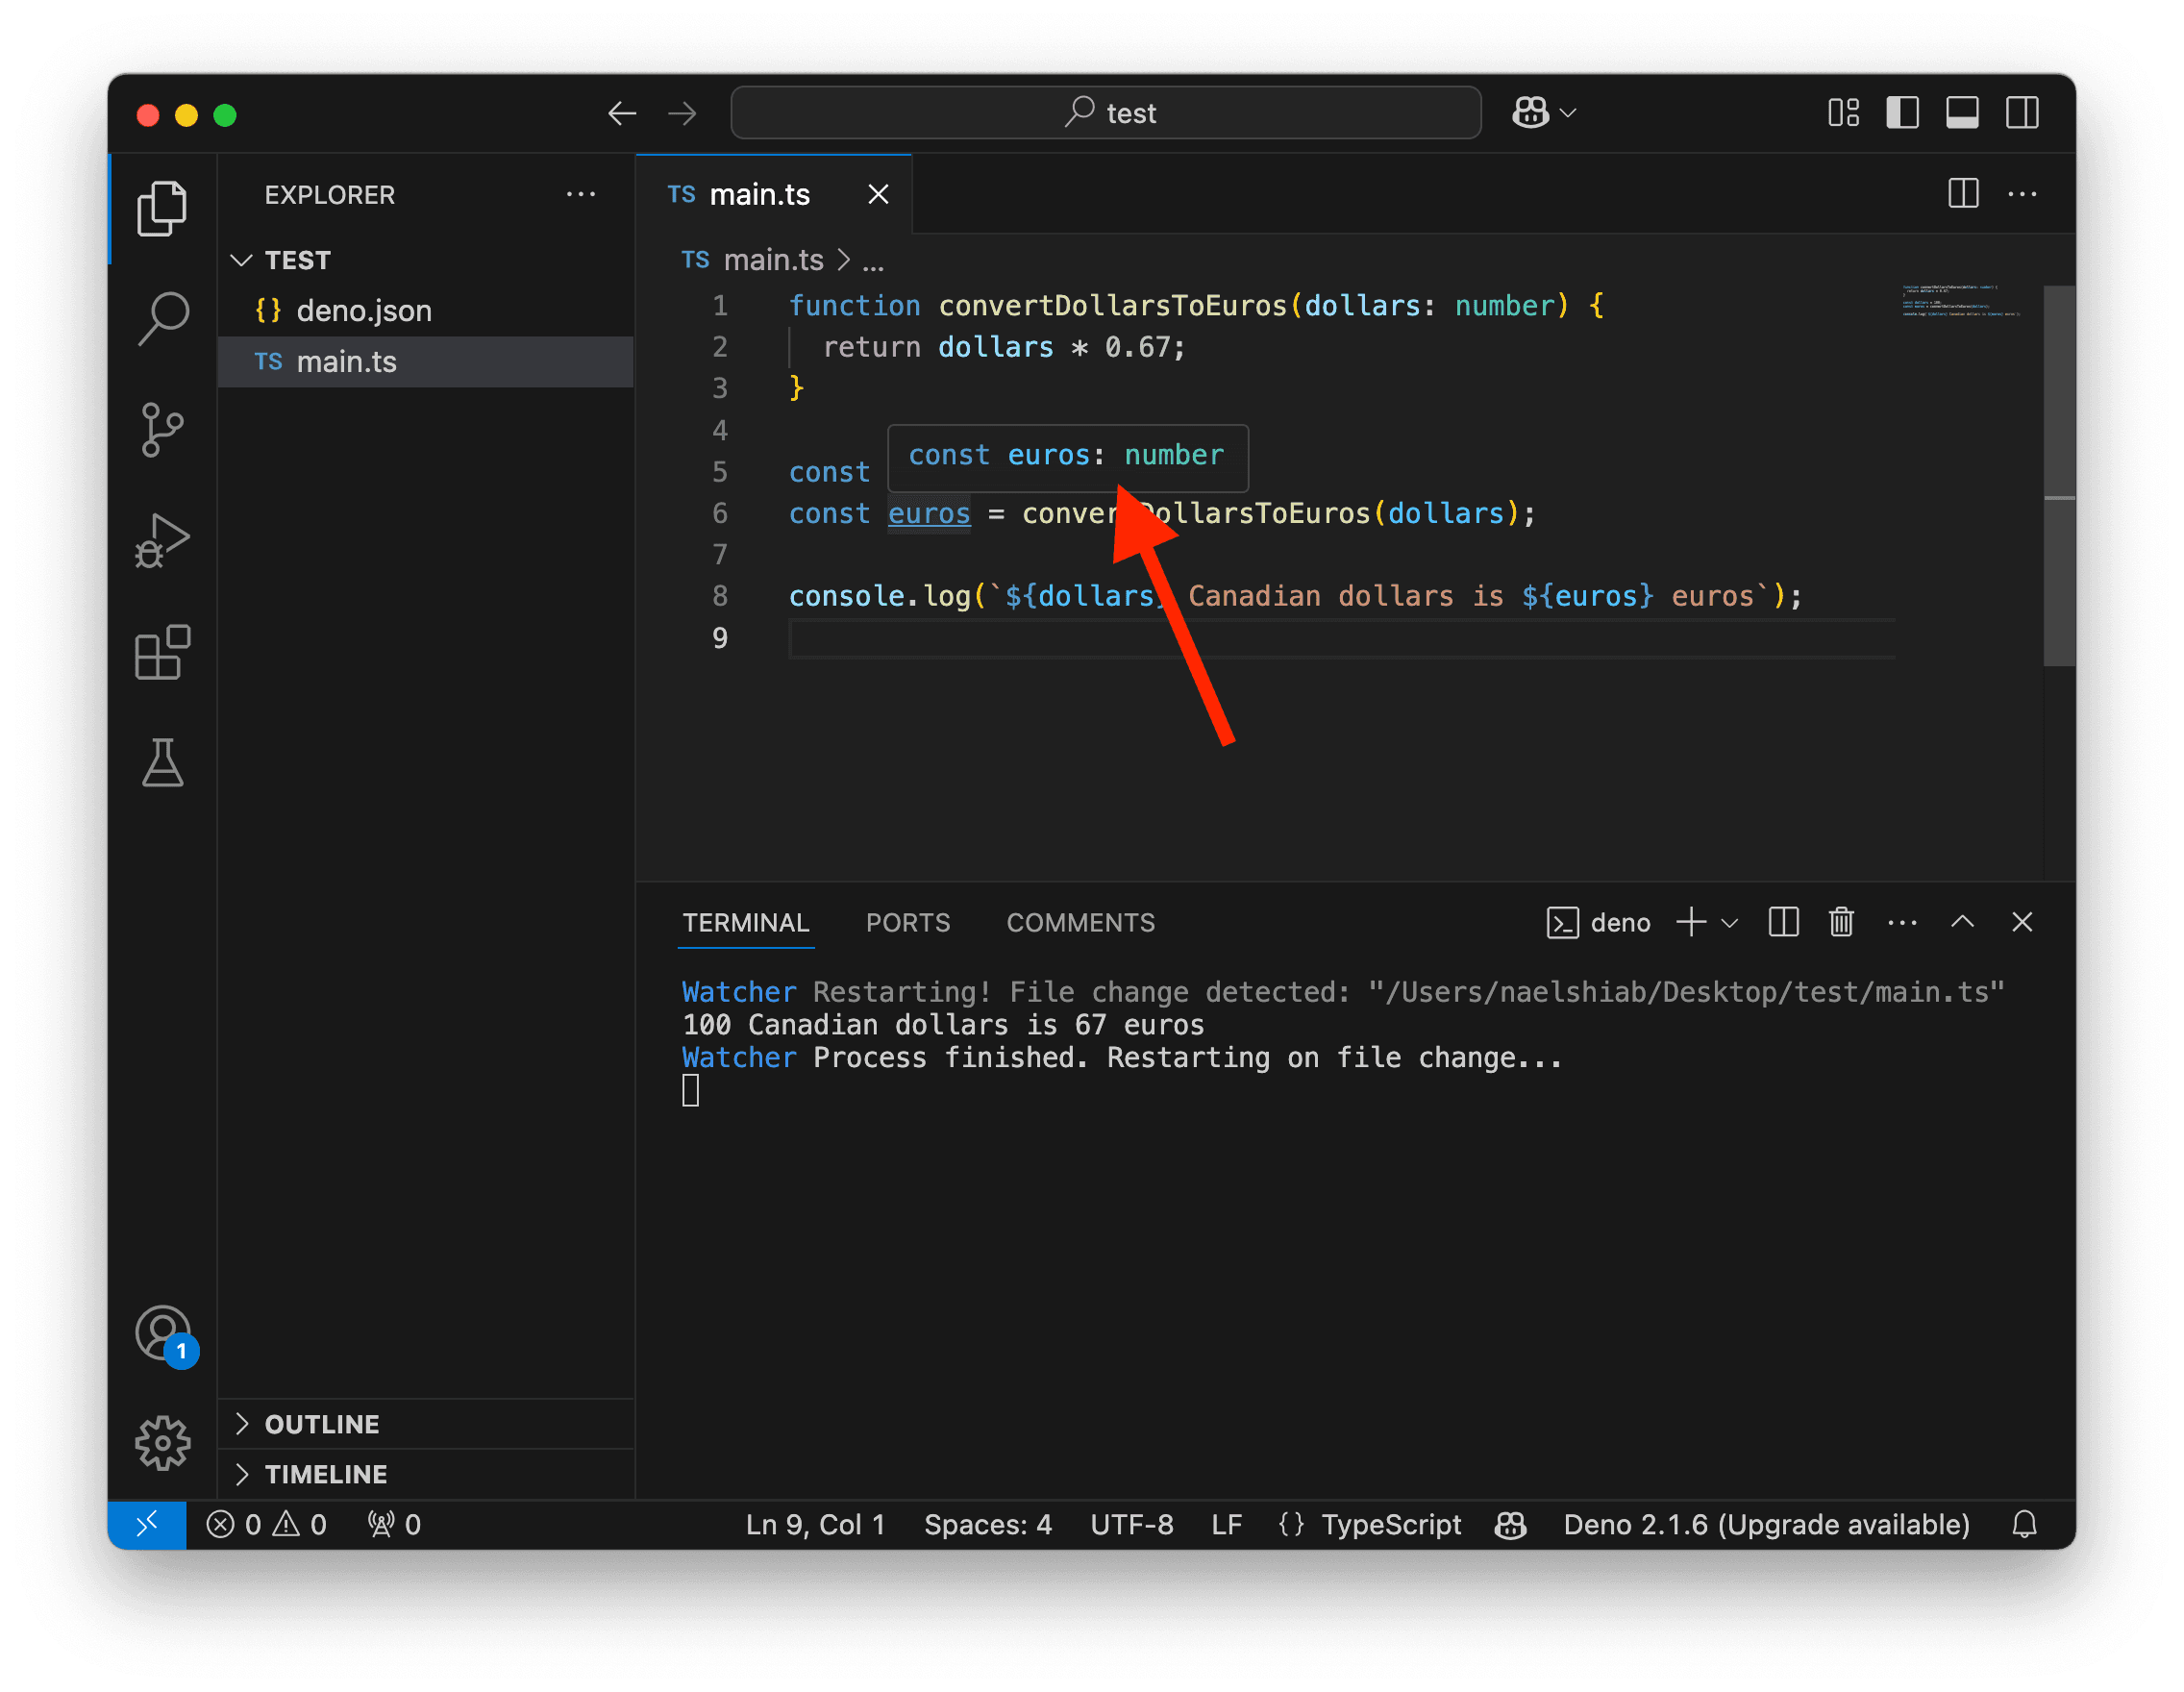
Let’s create a variable euros to store the returned value of convertDollarsToEuros(dollars) and log a proper message.
function convertDollarsToEuros(dollars: number) {
  return dollars * 0.67;
}

const dollars = 100;
const euros = convertDollarsToEuros(dollars);

console.log(`${dollars} Canadian dollars is ${euros} euros`);
As with parameters, returned values can be anything: strings, numbers, booleans, objects, or even functions.
Because functions are typed, the variables storing their return values are automatically typed as well.
If you hover over euros, you’ll see that its type is number because the return value of convertDollarsToEuros is number. When working on more complex algorithms with many functions, this type inference feels magical and helps you stay sane.
Exporting and importing
Since main.ts is our primary code entry point, we try to keep it lean. Cluttering it with function declarations is not optimal.
Typically, we keep functions in their own files. This makes debugging easier and also makes the functions reusable, as you can import them into other files.
We often group such functions into a folder called helpers.
In your current repository:
- Create a new folder named
helpers. - Create a new file named
convertDollarsToEuros.tsinhelpers. - Cut and paste the
convertDollarsToEurosfunction declaration into it.
Nothing will work for now, but that’s okay. You can click on the image below to enlarge it, if needed.

In VS Code, files are opened as tabs. By default, only one tab is shown. If you want to see multiple tabs side by side, right-click on a tab and then click Split up, Split down, Split left, or Split right. In the screenshot above, I chose Split right.
Now, the convertDollarsToEuros function is in a separate file, but it can’t be used anywhere else yet. There’s a yellow warning about it.
We need to make it available by exporting it.
Update your code in convertDollarsToEuros.ts by adding the keywords export default on line 1.
export default function convertDollarsToEuros(dollars: number) {
  return dollars * 0.67;
}
Now that convertDollarsToEuros is exported, we can import it anywhere we want!
In our case, we want to use it in main.ts. To do this, add the following line at the beginning of the file: import convertDollarsToEuros from "./helpers/convertDollarsToEuros.ts";.
IntelliSense recognizes that the function is available. If you start typing, it will suggest it to you. Pretty neat! Press Enter to accept the suggestion.
If you’re on a PC with Windows, you might see \ instead of / in the file path.

Here’s the code you should have in main.ts.
import convertDollarsToEuros from "./helpers/convertDollarsToEuros.ts";

const dollars = 100;
const euros = convertDollarsToEuros(dollars);

console.log(`${dollars} Canadian dollars is ${euros} euros`);When you import a file, you need to tell your computer where to find it with a path. Here, ./helpers/convertDollarsToEuros.ts is a relative path because it starts with ./. The . tells the computer to start where the current file is. In this case, since we are updating main.ts, it starts in the folder where main.ts is. Then /helpers tells the computer to go inside the helpers folder. Finally, /convertDollarsToEuros.ts tells it to import the content of this file. On PC with Windows, the path might use \ instead of /.
And now, everything works! If we had multiple files where convertDollarsToEuros was needed, we could easily import the function and reuse it in multiple places!

Also, since we are watching main.ts by running deno run --watch --check, we are automatically watching all of main.ts dependencies. This means that if you update convertDollarsToEuros.ts and save it, the terminal will be cleared, and the script will be rerun too. So useful!
Change 0.67 to 0.65 to see it in action. Notice on the first line in the terminal which file change the Watcher detected.

You might think that creating multiple files makes it more difficult to navigate your code. But if you press CMD on Mac or CTRL on PC and click on a function in your code, VS Code will automatically take you to the function’s file by opening a new tab.
Documentation
Documenting your functions is crucial if you want to reuse them in the future. Comments can do a pretty good job, but there is something even more handy: JSDoc.
To create documentation with JSDoc syntax, you need to use /** at the beginning of the documentation and */ at the end. Each line should start with a *. And that’s it!
Here’s a basic documentation added at the beginning of convertDollarsToEuros.ts. We have a simple description at first, followed by a description of the parameter dollars, and finally a description of the returned value.
/**
 * Converts an amount in Canadian dollars to euros.
 *
 * @param dollars - The amount in dollars to be converted.
 * @returns The equivalent amount in euros.
 */
export default function convertDollarsToEuros(dollars: number) {
  return dollars * 0.65;
}
The reason why JSDoc is so handy is because VS Code (and many other tools) understands it. If you hover over the function in main.ts now, you’ll see not only the types but also your documentation popping up!

We can improve our documentation by adding an example.
To ensure that VS Code recognize the example as code, we use a fenced code block with three backticks ```. When opening the block, we also specify ts so VS Code knows it’s TypeScript code and applies the relevant syntax highlighting.
/**
 * Converts an amount in Canadian dollars to euros.
 *
 * @example
 * ```ts
 * const dollars = 100;
 * const euros = convertDollarsToEuros(dollars);
 * console.log(euros); // 65
 * ```
 *
 * @param dollars - The amount in dollars to be converted.
 * @returns The equivalent amount in euros.
 */
export default function convertDollarsToEuros(dollars: number): number {
  return dollars * 0.65;
}
Arrow functions
Sometimes, you just need a simple function, especially when passing functions as parameters in methods like those for arrays.
Arrow functions provide a shorter way to write functions.
For example, this is a regular function that logs a string.
function sayHello(name: string) {
  console.log(`Hello, ${name}!`);
}

sayHello("Nael") // "Hello, Nael!"
It could be rewritten as an arrow function like this. It’s called an arrow function because the => resembles an arrow.
const sayHello = (name: string) => console.log(`Hello, ${name}!`);

sayHello("Nael") // "Hello, Nael!"
In the example above, there is no significant benefit to using an arrow function. However, when working with array methods, arrow functions can make your code simpler and more readable.
In the code below, we have an array of numbers that we want to filter, keeping only the positive numbers. The .filter() method requires a function as a parameter, so we declare the isPositive function and pass it to .filter().
Here’s how it looks with a regular function.
const numbers = [-2, -1, 0, 1, 2];

function isPositive(num: number) {
  return num > 0;
}

const positiveNumbers = numbers.filter(isPositive);

console.log(positiveNumbers); // [1, 2]
But we could simplify all of this by using an arrow function directly inside the .filter() parentheses.
const numbers = [-2, -1, 0, 1, 2];

const positiveNumbers = numbers.filter((num) => num > 0);

console.log(positiveNumbers); // [1, 2]
Because the type of numbers is inferred as a number[], your computer infers that the arrow function parameter num can only be a number. It’s very convenient.
With the regular function, you had to explicitly type num: number because your computer had no way of knowing for sure what num was supposed to be.
Conclusion
Functions are a fundamental part of programming. They help you organize your code, make it reusable, and keep it clean.
If you want to dig deeper into functions, check out the Refactoring lesson in the Ninja moves 🥷 section.